Sunday, December 30, 2012

Sticky Ginger Cake


Even though the holidays are nearly over, I can't get enough gingerbread-flavored baked goods.  The spices make my kitchen smell wonderful, and the heat from the oven provides a little extra warmth on these blustery winter days.  This dessert is the perfect all-purpose snack cake.  Kids will love it as an after school treat, and I found myself eating a square (or two) for breakfast.  It would make a great addition to your New Year's Day brunch too!

The cake itself is delicious, but the honey-molasses glaze keeps the cake moist and chewy for several days.  I recommend you make the cake  a day ahead of when you plan to serve it to give the molasses and ginger flavors some time to intensify.

The original recipe from Cooking Light uses all-purpose flour, but I swapped out half of the white flour for whole wheat flour.  I liked the nuttier flavor and denser texture that whole wheat flour provides, but I'm sure it would be just as delicious when using white flour.


I usually cringe when reading recipes that use fresh ginger because I inevitably have to buy a huge ginger root when I need only a few teaspoons.  Fresh ginger actually freezes really well, so just cut off what you need and store the rest in a plastic baggie in the freezer.  It will keep for about three months.  Problem solved!

This cake brought back memories of time I spent in England while on a mini-student exchange program in high school.  My host-mother would make these delicious snack cakes to serve with our after-school tea.  Whether it's served with tea or a tall glass of milk, make this cake and enjoy it with someone you love.

Sticky Ginger Cake
Adapted from Cooking Light
Serves 16

Ingredients

  • Cooking spray
  • 1/2 cup all-purpose flour
  • 1/2 cup whole wheat flour
  • 1 teaspoon baking soda
  • 1 teaspoon ground ginger
  • 1 teaspoon ground cinnamon
  • 1/2 teaspoon ground allspice
  • 1/4 teaspoon salt
  • 1 cup low-fat buttermilk
  • 2 large eggs, beaten
  • 5 tablespoons honey, divided
  • 5 tablespoons molasses, divided
  • 1/4 cup dark brown sugar
  • 2 tablespoons butter
  • 2 teaspoons grated fresh ginger
  • 1 tablespoon water
  • 1 teaspoon powdered sugar
Preparation


Preheat oven to 400°.
Lightly coat an 8-inch square metal baking pan with cooking spray. Set prepared pan aside.
Combine both flours and next 5 ingredients (through salt); stir with a whisk.  Combine buttermilk and eggs.  Combine 1/4 cup honey, 1/4 cup molasses, brown sugar, butter, and fresh ginger in a pan over medium heat.  Stir constantly until sugar melts.  Remove pan from heat; cool 5 minutes.  Add egg mixture to honey mixture, stirring with a whisk.  Add egg mixture to flour mixture; stir until well combined.
Pour batter into pan.  Bake at 400° for 25 minutes. Place on a rack; pierce surface with a skewer. Combine 1 tablespoon honey, 1 tablespoon molasses, and 1 tablespoon water; brush over hot cake. Cool.  Dust with powdered sugar.
Approximately 210 calories per serving, 2.5 grams of fat.


Saturday, November 10, 2012

Smoky Turkey Bacon Chili


It's been awhile since my last post, but I am excited to be blogging again! I am the Reluctant Home Cook after all. We've had a busy couple of months, and it's finally getting to be the perfect weather for staying inside and cooking and baking!

Nothing goes better with crisp fall weekends and football than a hearty bowl of chili. I made Eat Live Run's Beef and Bean Chili a few weeks ago and have been inspired to try some new chili recipes ever since. Fortunately, my sister-in-law Anne had given me a turkey chili recipe for my bridal shower cookbook. She and Andy are expecting a baby girl in December, and I am so excited to become an aunt! I've been drooling over Restoration Hardware's baby collection ever since her shower. Baby M - prepare to be spoiled!

Anyway - back to the chili . . .

Anne's recipe is delicious and filling but low in calories and fat because it uses ground turkey and is packed full of vegetables. I decided to add some bacon, chipotle chili powder and smoked paprika because that smoky flavor just screams fall to me. Each spoonful greets your palate with a subtle smoky flavor followed by medium heat from the chili powder and hot sauce. Carrots and peppers add some crunchiness. The chili is light enough (around 270 calories) that you can load it up with some creamy avocado, light sour cream and a few sprinkles of shredded cheese.

Add this to your list of go-to chili recipes for fall and winter. Make it on Sunday night, and you'll have plenty of leftovers for lunch on Monday.

Smoky Turkey Bacon Chili
From Anne's Kitchen
Serves 6

Ingredients

  • 2 slices applewood smoked bacon (chopped)
  • 1 cup chopped onions
  • 1 tablespoon minced garlic
  • 1 cup chopped bell peppers (any color - I used yellow)
  • 2 medium carrots (chopped into coins)
  • 1 lb. ground turkey
  • 1 28-ounce can crushed tomatoes
  • 1 tablespoon tomato paste (optional)
  • 1 can black-eyed peas (or whatever bean you prefer)
  • 1 tablespoon chipotle chili powder
  • 1 tablespoon sugar
  • 2 cups low-sodium chicken stock
  • 1/2 teaspoon garlic powder
  • 1 tablespoon smoked paprika 
  • 1 teaspoon hot sauce
  • 1.5 teaspoons kosher salt
  • 1 teaspoon dried basil
  • 1/2 teaspoon dried oregano
Preparation

In large skillet or 5.5 quart dutch oven, saute chopped bacon until crispy. Remove bacon from pan with slotted spoon and drain on a paper towel. Set aside.

Saute onions, garlic, bell pepper and carrots in the bacon drippings over medium heat until the onions are translucent. Add ground turkey and cook until browned and no pink remains.

Add remaining ingredients (including the cooked bacon) and stir well to combine. Reduce heat to low, cover and simmer for one hour, stirring occasionally. 

Serve plain or topped with avocado, sour cream, and cheese.

Per serving (approximate): 267 calories; 8.3 grams fat (2.4 grams saturated fat); 1,011 mg sodium; 29.7 grams carbohydrates; 21.7 grams protein.


Wednesday, July 11, 2012

Southwest Crispy Chicken Sliders


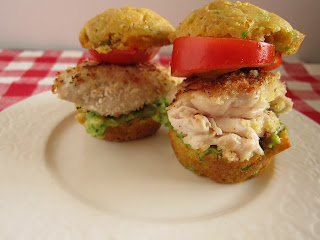
I am on a Cooking Light sandwich kick. This time we're making Southwest Crispy Chicken Sliders on a cheesy jalapeno cornbread muffin. While bacon, avocado, crispy chicken breast and cheese are on the ingredients list, two of these colorful sandwiches are just over 400 calories! We had them for lunch, but they would also make great appetizers or a fun addition to your next small plates dinner.

The recipe suggests you make your own cornbread muffins, and I was surprised at how quickly I mixed up the batter and got them into the oven. Not gonna lie - these muffins are on the "mini" side, but they stand up to the challenge of holding together some guac, chicken, and a thick tomato slice.

While the cornbread muffins are baking, I made some guacamole with chopped bacon and also prepared the crispy chicken pieces. Simply bread the chicken cutlets in panko breadcrumbs and then pan fry in a skillet over medium-high heat.

Building this towering slider is fun and easy - cut the muffins in half, layer on some guacamole, chicken, and a tomato slice and then finish with the muffin top! We enjoyed the subtle spice from the jalapeños in the cornbread and the crispy, salty bacon in the guacamole. The chicken stayed moist on the inside thanks to the crunchy panko bread coating. Nick and I both thought the chicken needed more seasoning, so next time, I am going to sprinkle some salt and pepper on the chicken breasts before breading them.


For a time-saving tip, you could also make the cornbread muffins in advance. They will stay fresh 2-3 days in an airtight container. If you have leftover muffins, serve them with some barbecued chicken and baked beans.


Southwest Crispy Chicken Sliders
Adapted from Cooking Light
Serves 6 (serving size - 2 sliders)

Ingredients:

Muffins -
  • 3 ounces all-purpose flour (about 2/3 cup)
  • 2/3 cup yellow cornmeal
  • 3/4 teaspoon baking soda
  • 1/4 teaspoon baking powder
  • 1/4 teaspoon kosher salt
  • 3/4 cup reduced-fat buttermilk
  • 2 tablespoons butter, melted
  • 1 large egg, lightly beaten
  • 1 1/2 ounces sharp cheddar cheese, shredded (about 1/3 cup)
  • 1 jalapeño pepper, seeded and minced
  • Cooking spray
Chicken -
  • 2/3 cup panko (Japanese breadcrumbs)
  • 1/4 cup fat-free milk
  • 1 large egg, lightly beaten
  • 6  skinless, boneless chicken cutlets, cut in half 
  • 2 tablespoons canola oil, divided
  • Salt and pepper to taste 
Additional ingredients -
  • 1 ripe, pitted, peeled avocado
  • 2 teaspoons fresh lime juice
  • 2 slices applewood-smoked bacon, cooked and crumbled
  • 12 (1/2-inch-thick) slices small, ripe tomato
  • 1/4 teaspoon kosher salt
  • 1/4 teaspoon freshly ground black pepper
Preparation:

Preheat oven to 350 degrees.

To prepare muffins, weigh or lightly spoon flour into dry measuring cups; level with a knife. Combine flour, cornmeal, baking soda, baking powder, and 1/4 teaspoon salt in a medium bowl, stirring well with a whisk. Combine buttermilk, butter, and 1 egg, stirring well. Add buttermilk mixture to flour mixture, stirring just until combined. Stir in cheese and jalapeño. Spoon batter into 12 muffin cups coated with cooking spray. Bake at 350 degrees for 17 minutes or until a wooden pick comes out clean. Cool 5 minutes in pan on a wire rack. Remove muffins from pan; cool on a wire rack. Cut muffins in half crosswise.

To prepare chicken, place panko in a shallow dish. Combine fat-free milk and 1 egg in a shallow dish, stirring well. Cut each cutlet piece in half, crosswise, to form 12 pieces. Heat a large skillet over medium-high heat. Add 1 tablespoon oil to pan; swirl to coat. Dip chicken in egg mixture; dredge in panko. Coat panko lightly with cooking spray. Add 6 chicken cutlets to pan; cook 3 minutes on each side or until golden and done. Repeat procedure with remaining 1 tablespoon oil, remaining 6 chicken cutlets, and cooking spray.
To prepare additional ingredients, combine avocado and lime juice; mash to desired consistency. Stir in bacon. Place 2 muffin bottom halves on each of 6 plates. Divide avocado mixture evenly among muffins; top each slider with 1 chicken cutlet and 1 tomato slice. Sprinkle tomato evenly with 1/4 teaspoon salt and black pepper; top with muffin tops.

Friday, July 6, 2012

Lightened Up Shrimp Po'boy Sandwiches


We can't drive by a Popeyes without Nick trying (I'll be honest, begging) me to stop and let him feast on fried shrimp and chicken with a side of biscuits. I will undoubtedly turn up my nose and start lecturing him about the insane about of fat, calories and sodium in the food. Just call me the fast food cop - saving the world one Bacon Double Cheeseburger at a time.

Cooking Light magazine's "Recipe Makeover" section may just keep me from turning into a complete food nag. Each month, the magazine makes a healthier version of our favorite calorie-bomb foods that we just can't live without. This month's makeover is the Shrimp Po'boy sandwich. I had to try it given my husband's fried shrimp obsession.


We made these hearty (yet healthy) sandwiches on the Fourth of July, so I had a bit more time to mess around in the kitchen. They are relatively easy, but preparing the sandwiches will take you about an hour or so. Be sure to get the pre-packaged coleslaw mix to save some time as well (shredding your own cabbage is messy business). I used pre-cooked shrimp to make these, but I think raw would be better. The extra cooking time would allow for a crunchier cornmeal coating on the shrimp.


After an intense morning spin class, we tore into the po'boys like there was no tomorrow (I was even practicing my Guy Fieri "hunch" to get the entire baguette into my mouth). The spicy Cajun flavor from the slaw was balanced by the crusty French bread and juicy tomato slices.  Grated lemon rind adds a nice brightness to the shrimp as well.

Serve the po'boys alongside some baked chips and a fruit salad, and you've got yourself a delicious and guilt-free meal, y'all. I'm collecting recipes for our family vacation in the Outer Banks, and I think this one will definitely be in the running for lunch or a light dinner!


Lightened-Up Shrimp Po'boys
Adapted from Cooking Light (July 2012 issue)
Serves 4

Ingredients:

For the Rémoulade slaw -
  • 3 tablespoons reduced-fat canola mayonnaise
  • 1 tablespoon minced shallots
  • 1 teaspoon fresh lemon juice
  • 1 teaspoon soy sauce
  • 1/2 teaspoon Dijon mustard
  • 1/4 teaspoon wasabi powder 
  • 1/4 teaspoon hot pepper sauce (such as Tabasco)
  • 1/4 teaspoon grated lemon rind
  • 1 garlic clove, minced
  • 2 1/2 cups packaged cabbage-and-carrot coleslaw

For the Po'boys -
  • 1 tablespoon cornstarch
  • 1/2 teaspoon grated lemon rind
  • 1/4 teaspoon kosher salt
  • 1/4 teaspoon ground red pepper
  • 1 large egg white
  • 1 pound medium shrimp, peeled and deveined
  • 4 (2 1/2-ounce) pieces French bread baguette, split and toasted
  • 3 tablespoons stone-ground cornmeal
  • 1/4 teaspoon freshly ground black pepper
  • 2 teaspoons extra-virgin olive oil
  • 8 (1/4-inch-thick) slices tomato
To prepare rémoulade slaw, combine first 9 ingredients in a medium bowl, stirring with a whisk. Add coleslaw; toss to coat. Cover and chill.

To prepare po'boys, combine cornstarch and next 4 ingredients (through egg white) in a medium bowl; whisk until blended. Add shrimp; toss well. Marinate in refrigerator 30 minutes, stirring once.

Hollow out top and bottom halves of bread, leaving a 1/4-inch-thick shell. Place torn bread in a food processor; process until very fine crumbs form. Set aside 1/2 cup breadcrumbs; reserve remaining breadcrumbs for another use. Combine 1/2 cup breadcrumbs, cornmeal, and black pepper in a large zip-top plastic bag; seal and shake to combine.

Remove shrimp from bowl; discard marinade. Add shrimp to breadcrumb mixture. Seal and shake to coat.

Heat a large nonstick skillet over medium-high heat. Add oil to pan; swirl to coat. Add shrimp; cook 3 minutes on each side or until done.

Arrange tomato slice on bottom half of bread. Top with 1/2 cup slaw and one quarter of shrimp. Cover with top half of bread.

Monday, June 18, 2012

Dirty Banana Ice Cream


Let me introduce you to a delicious St. Lucian frozen concoction called the "Dirty Banana." You'll find Lance and Jonathan serving them up all day long at the pool bar at our honeymoon spot, Calabash Cove Resort near Castries. Though we never knew exactly what was in the drink, I believe it consisted of a ripe banana, lots of dark rum, milk and simple syrup. Good thing it was banana season in St. Lucia as Nick drank a few of these each day we were there!


I wasn't trying to recreate the drink in ice cream form when I tried making this recipe, but the finished product brought us right back to the glorious infinity pool with the swim-up bar. Most of you probably don't have an ice cream maker lying around the kitchen, but I encourage you to invest in one NOW. We got ours on sale at Crate & Barrel for $60. I even reorganized our cabinets so that we could find a spot for it! There's nothing better than homemade ice cream, and the ability to create new and interesting flavors is a fun project for a relaxing summer weekend.

You will love the mixture of the fresh banana, crunchy toasted walnuts and the hint of dark rum flavor. It couldn't be easier to make - just mix the base together and throw it in the ice cream maker for about twenty minutes or so. Then add the bananas and walnuts. Sounds like my kind of summer dessert. I also used light cream in the recipe, so that cuts down on the fat and totally justifies an extra half-scoop.


Dirty Banana Ice Cream
Makes about 5 cups
Adapted from "The Best Ice Cream Maker Cookbook Ever"

Ingredients

  • 2 cups half-and-half or light cream
  • 1 14-ounce can fat-free sweetened condensed milk
  • 1/2 teaspoon vanilla extract
  • 2 overripe medium bananas
  • 2 tablespoons fresh lemon juice
  • 2 tablespoons dark rum
  • 3/4 cup toasted chopped walnuts 

Preparation


In a large bowl, combine the half-and-half, condensed milk, and vanilla. Whisk to blend. Cover and refrigerate until very cold, at least three hours or as long as three days.

In a small bowl, mash the bananas, lemon juice, and rum to form a coarse puree; there will be about 1 cup. Cover and refrigerate until needed.

Whisk the half-and-half mixture to blend and pour into the canister of an ice cream maker. Freeze according to the manufacturer's directions. When the ice cream is at the soft serve stage, add the mashed bananas and toasted walnuts and process 2 minutes longer.

Serve with vanilla wafers or caramel sauce.

Tuesday, June 12, 2012

Uncle Paul's Rhubarb Crunch Cake


I am about ready to jump in the car and drive the five hours up to Portland, PA to go through my Uncle Paul's stash of recipes and interview him for some baking and cooking tips. My uncle is a trained chef and clearly knows how to create amazing baked goods. I found this crunch cake in the recipe book from my bridal shower. It is getting to be the end of rhubarb season, so this cake was the perfect seasonal treat to try. I was a little hesitant to use strawberry Jello in a coffee cake, but no one is ever going to guess you used it! 

Nick and I agree that this is probably one of the best fruit coffee cakes we've ever had. The sour cream in the batter provides some density without compromising the lightness of the cake. Though the recipe has plenty of sugar, the rhubarb provides a hint of sourness that cuts through the sweet cake. The cinnamon, sugar and nut layers provide the satisfying crunch, balancing out the layers of fluffy cake and spongy rhubarb. This cake would be a delightful addition to a weekend brunch, afternoon tea, or a light summer meal. Add a scoop or two of vanilla ice cream to put this treat over the top.


I only used the two larger stalks of rhubarb. Fortunately, Nick stopped me from grabbing about five stalks at Whole Foods! This cake is relatively simple to make, but I did have some issues spreading the sticky batter into the greased pan. I think an offset spatula would work well. The layering is just batter, rhubarb, nut mixture, batter, nut mixture. It's okay if some of the rhubarb is peeking out along the edges. This just adds extra color to the top of the cake.

True confession - I forgot to add the first layer of the walnut / sugar mixture on top of the rhubarb. Hence, we had only half the crunch, but this cake was still amazing! Be careful not to over-bake it as the walnuts will start the burn.


I hope that the family chef will share some additional dishes with us - his recipes may become a permanent feature on the blog! We're praying for you . . . get better and get back in the kitchen soon.


Rhubarb Crunch Cake
From Paul Lebkuecher
Serves 18-20

Ingredients
  • 3 cups rhubarb pieces, 1/2" or smaller
  • 3 oz strawberry Jello
  • 1 cup unsalted butter
  • 1 1/4 cup sugar
  • 2 eggs
  • 1 cup sour cream
  • 2 cups flour
  • 1 teaspoon baking powder
  • 1/2 teaspoon baking soda
  • 1/2 teaspoon salt
  • 1/2 cup brown sugar
  • 1 teaspoon cinnamon
  • 2 tablespoons sugar
  • 1/2 cup chopped walnuts
Preparation

Mix rhubarb pieces thoroughly with strawberry Jello. Set aside to absorb color.

Make batter with next eight ingredients. Cream butter and sugar until light and fluffy. Beat in eggs well. Stir in remaining batter ingredients (sour cream, flour, baking powder, baking soda and salt). 

Mix the brown sugar, cinnamon, remaining sugar and walnuts in a small bowl.

Spread half of batter in greased 9 x 13" pan. Spread rhubarb mixture lightly over batter. Sprinkle half of the nut mixture over the rhubarb. Spread on remaining batter. Sprinkle the batter with the remaining nut mixture. 

Bake at 350 degrees for about 35 minutes or until browned.

Tuesday, May 22, 2012

Fish Tacos

We have several decent places to get fish tacos within walking distance of us (i.e. Baja Fresh and Lime Fresh Mexican Grill), but I decided to make them at home this weekend. The benefits? Controlling the amount of fat and using the freshest fish possible. The downside? Lots of steps and ingredients. Make these tacos on the weekend or your day off, folks!


Since I was going to the trouble of making homemade tacos, I decided to make these extra special with some grilled sweet corn (the first of the season), fresh cilantro and shredded napa cabbage on the side as fixings. Homemade tortillas would have been awesome, but I will save that challenge for some other time. I chose multi-grain tortillas as I'm not a huge fan of the corn ones.

The finished product was light and refreshing - full of fresh, crisp flavors like lime and cilantro balanced by the sour cream mixed with spicy and smokey chipotle peppers in adobo sauce. We used tilapia fillets - a light and flaky fish that will not overpower the other flavors in the taco. You could also use other white fleshed fish such as Mahi Mahi or Grouper (my favorite!). While this would be a great meal for grilling out, it is also grill-pan friendly for all you apartment dwellers.

First step is to get working on the grilled corn. My parents usually grill the ears in the husk, and then shuck the corn after grilling. I used another method that is a little easier for small stove-top grill pans - first soak the shucked ears of corn in a pot of cold water for about twenty minutes.


Chop up some onion and garlic. Place the ears on squares of aluminum foil, brush with olive oil, and then top with the onion and garlic (and some salt and pepper if you feel like it). Wrap the foil around the corn and twist the ends to secure the foil.


Place on a heated grill-pan and cook on medium-high heat for about twenty minutes, turning occasionally.


Set the corn aside and cool.

Whisk together the olive oil, lime juice (add a little zest if you want your fish to have extra lime flavor), and salt and paper in a small bowl. Pour the marinade over the tilapia fillets and let the fillets rest at room temperature while you prepare the other ingredients.


My chipotle cream sauce is just two teaspoons of chopped chipotle peppers in adobo sauce mixed with 1/2 cup sour cream. You could also use Greek yogurt for the base if you have that on had (just add some reduced-fat mayo for tang).


Grill the fish using your Griddler or a grill pan. It will just take a few minutes per side. Set aside for a few minutes, so the fish can cool. Then, shred the fish with a fork.


Using a sharp knife, take the corn kernels off the cob by standing the cob upright and sliding your knife across it in a horizontal motion.


Chop up a little cabbage or lettuce for extra crunch. Make sure you have some cilantro leaves and lime wedges on the side as well!


If you feel like being extra fancy, warm up the tortillas in the microwave or over on the grill for a few seconds. Build your taco by slathering some chipotle cream on your tortilla, followed by cabbage, fish, corn and cilantro. Serve it up with a lime wedge for an added citrusy tang. Most of us could use more fish in our diet, so try this recipe the next time you have a craving for Mexican food! 


Fish Tacos
Serves 3-4
Adapted from Ellie Krieger's The Food You Crave

Ingredients:
  • 2 tablespoons + 2 teaspoons olive oil, divided
  • 2 tablespoons freshly squeezed lime juice
  • salt and pepper to taste
  • 3/4 pound white flaky fish fillet (I used tilapia)
  • 2 small ears sweet corn (or 1/2 cup frozen corn, thawed)
  • 1/2 white onion (if grilling corn)
  • 2 cloves garlic, chopped (if grilling corn)
  • 2 teaspoons olive oil
  • 1/2 cup sour cream
  • 2 teaspoons chipotle pepper in adobo sauce
  • 1/4 cup fresh cilantro leaves
  • 1/2 cup shredded cabbage
  • Lime wedges for serving
In a small bowl, whisk together the oil, lime juice, salt and pepper. Pour over the fish fillets and let marinate for 20 minutes.

Remove the fish from the marinade and grill on a preheated grill or nonstick grill pan over a medium-high heat until cooked thorough, about 3 minutes per side. Set the fish aside on a plate for 5 minutes.

If grilling corn, remove the husk and then soak the ears in cold water for about twenty minutes. Meanwhile, chop onion and garlic. Place one ear on a sheet of aluminum foil and brush with olive oil. Top with half of the garlic and onion and then wrap in the foil, being sure to seal the edges. Repeat with the other ear of corn. Grill for about twenty minutes over medium-high heat, turning occasionally. (NOTE: You can skip this step entirely if you are just using frozen corn kernels).

In a small bowl combine the sour cream and chipotle pepper.

Heat the tortillas on the grill or grill pan for 30 seconds on each side.

Flake the fish with a fork. Top each tortilla with 1 tablespoon of the chipotle cream. Top with fish, cabbage, corn and cilantro and serve with lime wedges.

Sunday, May 6, 2012

Lighter Pulled-Pork Sandwiches


I adore a pulled-pork sandwich topped with creamy coleslaw. The best one I've ever had is from Corolla Village Barbecue on the Outer Banks of North Carolina. It's a tiny shack tucked away in the woods, but boy is it worth a stop. The smokey melt-in-your-mouth pork covered in tangy vinegar-based sauce tastes even divine sitting on a picnic table in a shade after a day at the beach. We also enjoy the pulled pork at Rocklands, our local barbecue place right here in Arlington.

Traditional pulled-pork sandwiches aren't too horrible for you, but pork shoulder can be high in fat, and I'm sure the sodium content is off the charts. I was a little skeptical about trying this lighter version but the recipe looked simple, and you can't really go wrong with shredded pork tenderloin.


Nick bought some jalapeno peppers to add to the coleslaw. I think this addition totally made the dish. It adds some heat and crunch to the coleslaw but is not overpowering because of the creamy mayo dressing. The pork is wonderfully tender, and the sauce has a light tang balanced by the sweetness of the brown sugar. The sauce has a bit more body than a traditional vinegar-based sauce which means it won't make your bun soggy.

First step is to make the barbecue sauce base. I used Dijon mustard, but you could also use spicy brown mustard if you have that on hand. Season it well with salt and pepper.


Bring the sauce to a boil. 


Add in the chunks of pork tenderloin.


Cover and simmer over medium-low heat.


Meanwhile, make the dressing for the coleslaw. Whisk the mixture together until smooth.


Add in the shredded cabbage (use the pre-shredded bagged coleslaw mix to save time) and the jalapenos. Mix it together with the dressing. Add more cabbage if you think you have too much dressing. Refrigerate the slaw to let the flavors meld. 


The pork will probably be ready to remove from the sauce once you are finished with the coleslaw. 


Simmer the sauce over medium heat until reduced. Mine was pretty thick by the time I turned off the heat. 


Shred the pork (I used my fingers) and then add it to the sauce. 


Take the slaw out of the fridge and begin to assemble your sandwiches. 


Serve the pork with some roasted sweet potato wedges to make it a hearty and healthy meal (great for the weekend when you have some extra time to make lunch or dinner). I think this sandwich might just hold me over until we head out to the Banks this summer. Thankfully it won't do too much damage to my waist line!


Lighter Pulled-Pork Sandwiches
Adapted from Everyday Food Light
Serves 4

Ingredients

  • 1 can (15 ounces) crushed tomatoes
  • 1 tablespoon light or dark brown sugar
  • 2 garlic cloves, finely chopped
  • 1 tablespoon Dijon mustard
  • 1/2 cup plus 1 tablespoon water
  • Coarse salt and ground pepper
  • Pinch of crushed red pepper flakes (optional)
  • 1 pork tenderloin (about one pound), cut into four pieces
  • 1/4 cup light mayonnaise
  • 1 tablespoon plus 1 teaspoon cider vinegar
  • 1/4 teaspoon celery seeds (I used herbes de provence)
  • 1/4 small head green cabbage, shredded (or you could use the bagged coleslaw mix to save time)
  • 1 jalapeno, seeded and finely chopped
  • 4 whole wheat rolls, split
Preparation

In a medium saucepan, stir together tomatoes, sugar, garlic, mustard, chili flakes, and 1/2 cup water; season with salt and pepper. Bring to a boil; add pork, cover and simmer until tender, 20 to 22 minutes. Transfer pork to a plate to cool. Continue to simmer sauce (uncovered) over medium heat until reduced by half, about 20 minutes.

Meanwhile, in a small bowl, whisk together mayonnaise, 1 tablespoon vinegar, seeds or herbs, jalapeno, and remaining 1 tablespoon water; season with salt and pepper. Add cabbage, and toss to coat. Refrigerate until ready to serve.

Shred pork with fingers or two forks, and return to sauce; stir in remaining teaspoon vinegar. Serve pork on rolls, topped with cabbage mixture.

Per Serving: 369 calories; 11.2 grams fat (2.5 grams saturated fat); 30.2 grams protein; 38.2 carbohydrates; 6.7 grams fiber.

Tuesday, May 1, 2012

Key Lime Pie Macaroons


I absolutely fell in love with Smitten Kitchen's raspberry coconut macaroon recipe about a month ago. I made them for my sister's bridal shower and have been dreaming up variations on the recipe ever since. My dad, a true macaroon lover, declared that these luscious treats were as close to macaroon perfection as we'll get this side of heaven. High praise, indeed.

SK's recipe has you process the sweetened flaked coconut in the food processor several times before shaping the cookie into a ball and baking it. The processed coconut provides a light and fluffy texture that even non-coconut lovers will find hard to resist. If you don't have a food processor, you could probably use a blender instead. However, I suggest you go out and buy one now because they are so versatile and fun to use! Even Nick has fun using ours.

Key Lime Pie Macaroons came to mind since lime and coconut pair so well together. I created the crust by dipping the macaroons in white chocolate and then in crushed graham crackers before the chocolate had set. My macaroons had a more delicate lime flavor, but you could use more zest and juice if you want to kick them up a notch. Make these for dessert after a dinner of Kathy's Waikiki Meatballs, and you'll find yourself with a case of island fever!


First step is to process the sweetened flaked coconut for about a minute.


Add the sugar and process again.


Then, add in the lime juice, salt, almond extract and egg whites. Process yet again!


Add in the lime zest and pulse a few times to incorporate.


I highly recommend you get a mini ice cream scoop or melon baller to make the macaroons. It makes the macaroons more uniform in size, and you won't get your fingers all sticky. Use parchment paper or Silpat-lined baking sheets.


Bake for about 25-30 minutes. Let them cool slightly and then you can dip them in the white chocolate and graham cracker crumbs. I just bought some white chocolate chips and microwaved them for about 45 seconds. After stirring the heated chips, I microwaved them for another 15 seconds or so until completely melted. Dip immediately in finely crushed graham cracker crumbs, and then let them set on wax paper.


These cookies will remind you of those coconut lime patties sold at the airport gift stores in Florida - yum!


Key Lime Pie Macaroons
Makes 40-50 small cookies

Ingredients:
  • 1 14-ounce bag sweetened flaked coconut
  • 2/3 cup sugar
  • 3 large egg whites
  • Juice of half a large lime (add more juice if you feel the mixture could handle more liquid)
  • 1/4 teaspoon salt
  • 1 1/2 teaspoons lime zest
  • 1/2 teaspoon almond extract
  • 3/4 cup white chocolate chips, melted (I melted my chips in the microwave. Microwave the chips for about 45 seconds, stir and reheat for 15 seconds, stir again. Keep up with the process until the chips are entirely melted. Be careful not to burn the chips.)
  • 1/3 cup graham cracker crumbs
Preparation:

Preheat oven to 325°F. Line two large baking sheets with parchment paper or Silpat.

In a food processor, blend the coconut for a minute. Add sugar, blend another minute. Add egg whites, lime juice, salt, almond extract and blend for another minute. Add lime zest and pulse machine a few times to incorporate.

With a tablespoon measure or small cookie scoop, scoop batter into 1-inch mounds. You can arrange the cookies fairly close together as they don’t spread, just puff a bit.

Bake cookies for 25 to 30 minutes, until they look a little toasted on top. Let them rest on the tray for 10 minutes after baking and then place them on a cooling rack for another 10-15 minutes. Once cool and firm, dip them in the melted white chocolate followed by the graham cracker crumbs.